近一年多一直在用 MacOS 做 Linux 内核开发,因为是 POSIX 兼容的环境所以把一些坑旅顺之后,竟然感觉还挺顺手的,而且因为基本不用其他特性也没感受到几个 MacOS 的 Bug 问题,体验甚佳。不过也有一些奇怪的地方,花了一些精力去适配,还是挺值得的:
UNIX 兼容与 SSH 配置
MacOS 上还算友好的就这点,默认的用户目录就是 UNIX 环境中的 $HOME 变量,文件路径分隔符是 “ / ”,有 / 根目录,软连接,chmod 权限等,一些常见的命令基本都一样,不过是更偏 BSD 风格。对于不太依赖 Linux/GNU 特性的 POSIX 兼容程序,脚本之类的,基本都可以直接跑起来。所以整体对没有复杂依赖的内核开发,Web 开发等,还是很友好的。
直接在 Launchpad 上面搜索框里搜 Terminal / 终端,然后固定一个底端快捷方式),一些常用工具,比如 SUDO, SSH,都有,比如可以直接在终端中运行:
ssh-keygen -t rsa -b 4096 -o -a 100
生成的 SSH key 默认就放在 MacOS 用户目录,~/.ssh/id_rsa.pub。
当然也有很多不一样的,毕竟是苹果的 OS。桌面环境就是基于此进行了很多封装,更偏向于以 Application 为对象进行管理和交互,文件管理就不怎么方便了… 比较方便的是终端里可以用 open <filename> 的方式正常打开一个文件或者跳到 Finder 中。
当然默认并没有包管理器(下面会用 Homebrew 进行软件包管理)。
Homebrew 包管理
这个基本是 MacOS 上想做任何和代码沾边的事情的标配了,安装也很简单,跟着主页的操作就一两步:https://brew.sh/
之后就可以用 Brew 安装各种软件,Terminal 里执行 brew install <name> 来安装,brew update 升级,brew uninstall <name> 卸载,没什么特别的。
或许值得注意的是开发细节是,在 M1 平台上,Brew 默认把所有文件都安装到了 /opt/homebrew 中而不是我们常见的 /usr,然后通过更改 $PATH 的方式使其可用。
有时在系统更新后会出现一些 binary 不可用的情况,可以用 xcode-select –install 来解决。
终端和字体
MacOS 的字体渲染和配置是真的好,默认终端对我来说也足够用了,只是为了支持特殊符号,我一般会安装 Nerd Font 来支持一些奇怪的 TUI 应用符号。
MacOS 默认终端设置中可以更改默认 Profile 来改变样式,我改为了暗色主题 + 字体选择了 Nerd Font Hack,这里也有很多其他不错的字体可用:
适应 MacOS 的快捷键
MacOS 上似乎很多快捷键都和操作方式都是完全钉死的… 因此我也不打算去 Hack 相关内容,尽量去适应 MacOS 的操作逻辑,实际用下来竟然意外的不错。
工作流上,每次基本只打开一个终端实例,然后按 Ctrl + Command + F 设为全屏,这样这个桌面我就只用来访问终端了。Ctrl + ⬅️ 和 Ctrl + ➡️ 可以只用键盘在终端和其他 App 之间切换,在终端页面 Command + T 创建新 Tab,每个 Tab 里用开一个 Tmux,这样,Command + 数字 1 – 9 切换 Tab,每个 Tab 里 Ctrl + B 后按 1 – 9 切换 Tmux 窗口,一个 Tab 可以专注一个 Task。
Shell 选择和配置
MacOS 自带的 Shell 很老旧,Bash 3.x,我切换到了 Fish。
Fish Shell:https://fishshell.com/,官方整合了 Brew 安装,即直接执行 brew install fish。安装后在 Terminal 中按 Command + “,” 打开设置,把 General 中的 “Shells open with” 改成 “/opt/homebrew/bin/fish”,新打开的 Terminal 就默认使用 Fish 了。
在 Shell 上进行更一步的定制化就和其他 OS 差异不大,比如我一直在用的 Starship,一个可以提供非常好看的 Shell Prompt:https://starship.rs/,按照 Installation 中的 macOS 以及 Fish 对应的方法即可配置安装。
我自己的 Shell 中各种 Helper 和 配置都比较繁多,整理了一个 Git Repo:https://github.com/ryncsn/.home
大小写敏感的 Volume
MacOS 上我遇到的第一个重大问题就是文件系统是默认大小写不敏感的,我的解决方法也还好,在 Launchpad 里面的 Disk Utility 里可以很方便的创建一个新 Volume ,创建的时候格式可以选择带 “Case-Sensitive” 的即可。这个 Volume 类似 ZFS / BTRFS 中的抽象 Volume,不需要预设大小等。
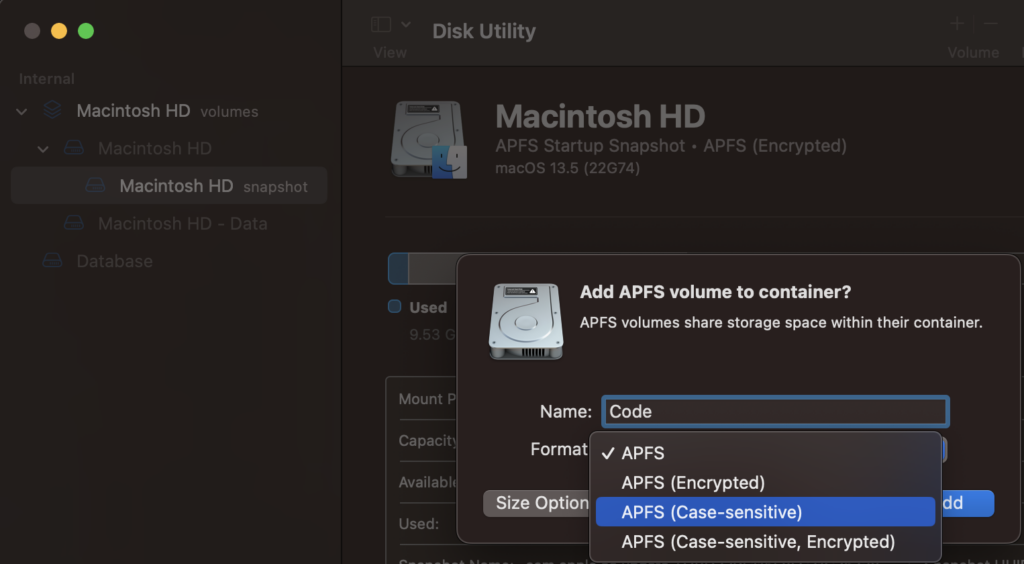
点击图上右上角加号就可以添加 Volume 了。
新建的 Volume 会出现在 /Volume 路径中,为了方便使用我用 ln -s /Volume/<vol name>/<dir> ~/<dir> 的形式,将需要区分大小写的项目等放在软连接的目录中。
虚拟机
目前 HVF + Libvirt 可用度很不错了,只需要用 brew install libvirt,然后 sudo brew service start libvirt(这里使用 Root 权限是为了使用 XML 里的 virtio-net,可以不用 Root,不过后续 virsh 操作也需要去掉 sudo),就可以使用熟悉的 sudo virsh 操作了(同样 Root 权限,所以其实是 sudo virsh)。Libvirt 可能会需要手动启动一下 virtlogd,执行 sudo virtlogd -d 即可我的虚拟机 XML 参考如下,注意把里面 EFI 固件的文件地址和磁盘镜像地址换成你自己的 Qcow2 image。
其中 <nvram template=’/opt/homebrew/Cellar/qemu/10.0.2_1/share/qemu/edk2-arm-vars.fd’ templateFormat=’raw’ format=’raw’>/Users/<user>/.config/libvirt/qemu/nvram/Fedora_VARS.fd</nvram> 是 NVRAM 内容,需要自己通过模版拷贝一个出来。
<domain type='hvf' id='7' xmlns:qemu='http://libvirt.org/schemas/domain/qemu/1.0'>
  <name>VM_NAME</name>
  <memory dumpCore='on' unit='KiB'>4194304</memory>
  <currentMemory unit='KiB'>4194304</currentMemory>
  <vcpu placement='static'>12</vcpu>
  <os firmware='efi'>
    <type arch='aarch64' machine='virt-9.0'>hvm</type>
    <firmware>
      <feature enabled='no' name='enrolled-keys'/>
      <feature enabled='no' name='secure-boot'/>
    </firmware>
    <loader readonly='yes' type='pflash' format='raw'>/opt/homebrew/Cellar/qemu/10.0.2_1/share/qemu/edk2-aarch64-code.fd</loader>
    <nvram template='/opt/homebrew/Cellar/qemu/10.0.2_1/share/qemu/edk2-arm-vars.fd' templateFormat='raw' format='raw'>/Users/<user>/.config/libvirt/qemu/nvram/Fedora_VARS.fd</nvram>
    <boot dev='cdrom'/>
    <boot dev='hd'/>
  </os>
  <features>
    <acpi/>
    <apic/>
    <gic version='3'/>
  </features>
  <cpu mode='custom' match='exact' check='none'>
    <model fallback='forbid'>host</model>
  </cpu>
  <clock offset='utc'>
    <timer name='rtc' tickpolicy='catchup'/>
    <timer name='hpet' present='no'/>
    <timer name='pit' tickpolicy='delay'/>
  </clock>
  <on_poweroff>destroy</on_poweroff>
  <on_reboot>restart</on_reboot>
  <on_crash>destroy</on_crash>
  <devices>
    <emulator>/opt/homebrew/bin/qemu-system-aarch64</emulator>
    <disk type='file' device='disk'>
      <driver name='qemu' type='raw' cache='directsync'/>
        <source file='/Users/<user>/Images/Fedora-Cloud-Base.raw' index='3'/>
      <backingStore/>
      <target dev='vda' bus='virtio'/>
      <alias name='virtio-disk0'/>
      <address type='pci' domain='0x0000' bus='0x02' slot='0x00' function='0x0'/>
    </disk>
    <disk type='file' device='disk'>
      <driver name='qemu' type='qcow2'/>
      <source file='/Users/<user>/Images/Data.qcow2' index='2'/>
      <backingStore/>
      <target dev='vdb' bus='virtio'/>
      <alias name='virtio-disk1'/>
      <address type='pci' domain='0x0000' bus='0x03' slot='0x00' function='0x0'/>
    </disk>
    <disk type='file' device='disk'>
      <driver name='qemu' type='raw'/>
      <source file='/Users/<user>/Images/Image.raw' index='1'/>
      <backingStore/>
      <target dev='vdc' bus='virtio'/>
      <alias name='virtio-disk2'/>
      <address type='pci' domain='0x0000' bus='0x05' slot='0x00' function='0x0'/>
    </disk>
    <controller type='pci' index='0' model='pcie-root'>
      <alias name='pcie.0'/>
    </controller>
    <controller type='pci' index='1' model='pcie-root-port'>
      <model name='pcie-root-port'/>
      <target chassis='1' port='0x8'/>
      <alias name='pci.1'/>
      <address type='pci' domain='0x0000' bus='0x00' slot='0x01' function='0x0' multifunction='on'/>
    </controller>
    <controller type='pci' index='2' model='pcie-root-port'>
      <model name='pcie-root-port'/>
      <target chassis='2' port='0x9'/>
      <alias name='pci.2'/>
      <address type='pci' domain='0x0000' bus='0x00' slot='0x01' function='0x1'/>
    </controller>
    <controller type='pci' index='3' model='pcie-root-port'>
      <model name='pcie-root-port'/>
      <target chassis='3' port='0xa'/>
      <alias name='pci.3'/>
      <address type='pci' domain='0x0000' bus='0x00' slot='0x01' function='0x2'/>
    </controller>
    <controller type='pci' index='4' model='pcie-root-port'>
      <model name='pcie-root-port'/>
      <target chassis='4' port='0xb'/>
      <alias name='pci.4'/>
      <address type='pci' domain='0x0000' bus='0x00' slot='0x01' function='0x3'/>
    </controller>
    <controller type='pci' index='5' model='pcie-root-port'>
      <model name='pcie-root-port'/>
      <target chassis='5' port='0xc'/>
      <alias name='pci.5'/>
      <address type='pci' domain='0x0000' bus='0x00' slot='0x01' function='0x4'/>
    </controller>
    <filesystem type='mount' accessmode='squash'>
      <source dir='/Volumes/Codebase'/>
      <target dir='Codebase'/>
      <alias name='fs0'/>
      <address type='pci' domain='0x0000' bus='0x04' slot='0x00' function='0x0'/>
    </filesystem>
    <interface type='user'>
      <mac address='52:54:00:1f:51:94'/>
      <model type='virtio'/>
      <alias name='net0'/>
      <address type='pci' domain='0x0000' bus='0x01' slot='0x00' function='0x0'/>
    </interface>
    <serial type='pty'>
      <source path='/dev/ttys014'/>
      <target type='system-serial' port='0'>
        <model name='pl011'/>
      </target>
      <alias name='serial0'/>
    </serial>
    <console type='pty' tty='/dev/ttys014'>
      <source path='/dev/ttys014'/>
      <target type='serial' port='0'/>
      <alias name='serial0'/>
    </console>
    <audio id='1' type='none'/>
  </devices>
  <seclabel type='none' model='none'/>
  <seclabel type='dynamic' model='dac' relabel='yes'>
    <label>+0:+0</label>
    <imagelabel>+0:+0</imagelabel>
  </seclabel>
  <qemu:commandline>
    <qemu:arg value='-device'/>
    <qemu:arg value='virtio-net,netdev=net0,mac=51:24:09:1c:22:31,addr=0xA'/>
    <qemu:arg value='-netdev'/>
    <qemu:arg value='vmnet-host,id=net0'/>
  </qemu:commandline>
</domain>
因为经常需要对虚拟机的细节进行调整和串口访问,又不想操作太多 Qemu 命令,所以使用了 Libvirt 来管理。这个虚拟机使用的是 HVF,硬件虚拟化没有什么开销。
其中 <filesystem type=’mount’ accessmode=’squash’> 这一行启动了文件共享,Guest 内部可以使用 9p 进行 mount 直接访问宿主文件:
在 Guest 内部:
sudo mount -t 9p Codebase -o trans=virtio /Volumes/Codebase
同时这个 XML 给 Guest 提供了两个网卡,一个 SLIRP 和宿主机通讯(<interface type=’user’> 这一行,宿主机 IP 是 10.0.2.1,是 Qemu 定义的),一个可以高性能访问外网(<qemu:arg value=’virtio-net,netdev=net0,mac=51:24:09:1c:22:31,addr=0xA’/> 和旁边两行)。
也可以通过 NFS 进行共享,见下方。
NFS 文件共享
文件共享我用的是 MacOS 自带的 NFSv3,配置 /etc/exports 即可,不过 exports 里面格式比较怪,如下(详细可在 Terminal 中运行 man exports 来查看):
/Volumes/<YOUR_NFS_SHARE_PATH> -alldirs -maproot=root:wheel 127.0.0.1直接挂载可能会看到类似如下错误:
mount -v -t nfs 10.0.2.2:/Volumes/XXX /mnt/Volume/XXX
mount.nfs: timeout set for Mon Oct 30 17:41:01 2023
mount.nfs: trying text-based options 'vers=4.2,addr=10.0.2.2,clientaddr=10.0.2.15'
mount.nfs: mount(2): Protocol not supported
mount.nfs: trying text-based options 'vers=4,minorversion=1,addr=10.0.2.2,clientaddr=10.0.2.15'
mount.nfs: mount(2): Protocol not supported
mount.nfs: trying text-based options 'vers=4,addr=10.0.2.2,clientaddr=10.0.2.15'
mount.nfs: mount(2): Protocol not supported
mount.nfs: trying text-based options 'addr=10.0.2.2'
mount.nfs: prog 100003, trying vers=3, prot=6
mount.nfs: trying 10.0.2.2 prog 100003 vers 3 prot TCP port 2049
mount.nfs: prog 100005, trying vers=3, prot=17
mount.nfs: trying 10.0.2.2 prog 100005 vers 3 prot UDP port 835
[933.642116] RPC: server 10.0.2.2 requires stronger authentication.
mount.nfs: mount(2): Permission denied
mount.nfs: access denied by server while mounting 10.0.2.2:/Volumes/XXX
原因是 MacOS 的 NFS server 默认要求源端口需要是 reserved 范围内,这个并不能保证而且并不能提升安全性。在 MacOS 侧的 /etc/nfs.conf 中,加入如下内容即可修复:
nfs.server.require_resv_port = 0
nfs.server.mount.require_resv_port = 0
另外值得一提的是,不需要串口的,需要更好的网络和文件共享性能,只想用 Docker 等的话,podman 是个非常好的选择,brew 里的 podman 自带虚拟机管理,会启动一个虚拟机并通过其来。
内核代码构建
在 Mac OS 上进行原生代码编辑和补全比想象中容易得多,我使用 neovim + 内核自带的
./scripts/clang-tools/gen_compile_commands.py 即可轻松进行 Clangd 补全(仅限新的上游内核,5.X 老版本可能还是扔到虚拟机内部构建更合适)。
构建也可以在 Host 上进行,在最新的 Upstream 版本中(6.X),使用如下命令即可以直接在 MacOS 上构建代码:
source $(which bee-init)
make LLVM=1 -j12
串口使用
我个人比较喜欢直接用串口访问,可以进行非常方便的调试:
sudo virsh console <VM_NAME> | tee console.log
这里的 tee 可以将所有输出记录在 console.log 又保证交互不被破坏。为了方便登陆,如果 Guest 也是用 Systemd 启动的话,可以在 Guest 内部使用:
sudo passwd -d root # 清除 Root 账户密码
sudo systemctl edit [email protected] # 修改 getty 配置
并增加
[Service]
# # The '-o' option value tells agetty to replace 'login' arguments with an
# # option to preserve environment (-p), followed by '--' for safety, and then
# # the entered username.
ExecStart=
ExecStart=-/sbin/agetty --autologin root -o '-p -- \\u' --keep-baud 115200 - $TERM
来自动登陆到 Root 账户。
如果使用 tmux 等工具发现窗口大小异常,可以安装终端大小自动检测工具:
sudo dnf install xterm-resize
并在每次登陆后执行一下 resize 命令修正窗口大小(可以扔到登陆 rc 文件中)。
